Learn the magical art of sewing
By: Shirley de Gannes
How To Take Measurements
For most of us there is something magical about being able to sew and design clothes.

The creation of beautiful, flattering clothes is
within the capacity of everyone.
How to improve on a Designer Runway Creation
To make the dress fit I inserted black & white zebra patterned ribbon at the sides. Wear with black tights - Loving the new look! What magic you can do with a sewing machine.

Sprucing up an old blouse to make it a fashion statement


All you need is some lace
 Stitch lace on the hem of the blouse and on the sleeves
 ...Now you have a trending statement blouse
SEWING CLASSES IN PROGRESS
 Sewing Classes in Progress


About Textiles
How to get a straight even cut with chiffon

Redesigning a purple chiffon dress
 The original dress was very simple, but I wanted to spruce it up to attend a wedding
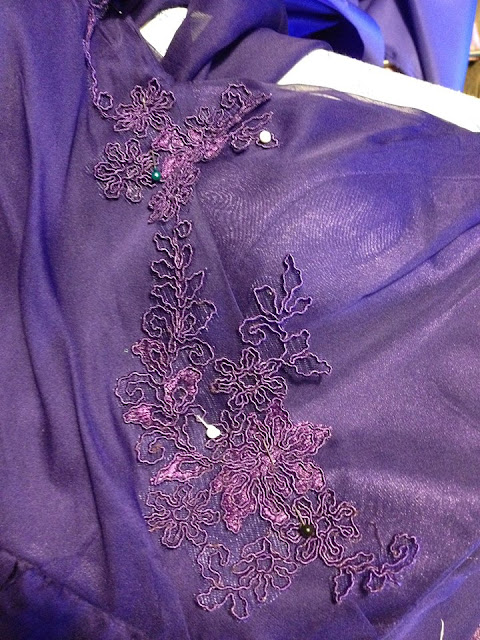 I purchased about a 1/4 yd. of purple lace and cut out the motif pattern to make an applique
 I embellished the applique with tiny pearls, beads and sequins


MAKING A SHOWER CURTAIN WITH GROMMETS


Add trim and style


Join front and back of dress together by basting before stitching.


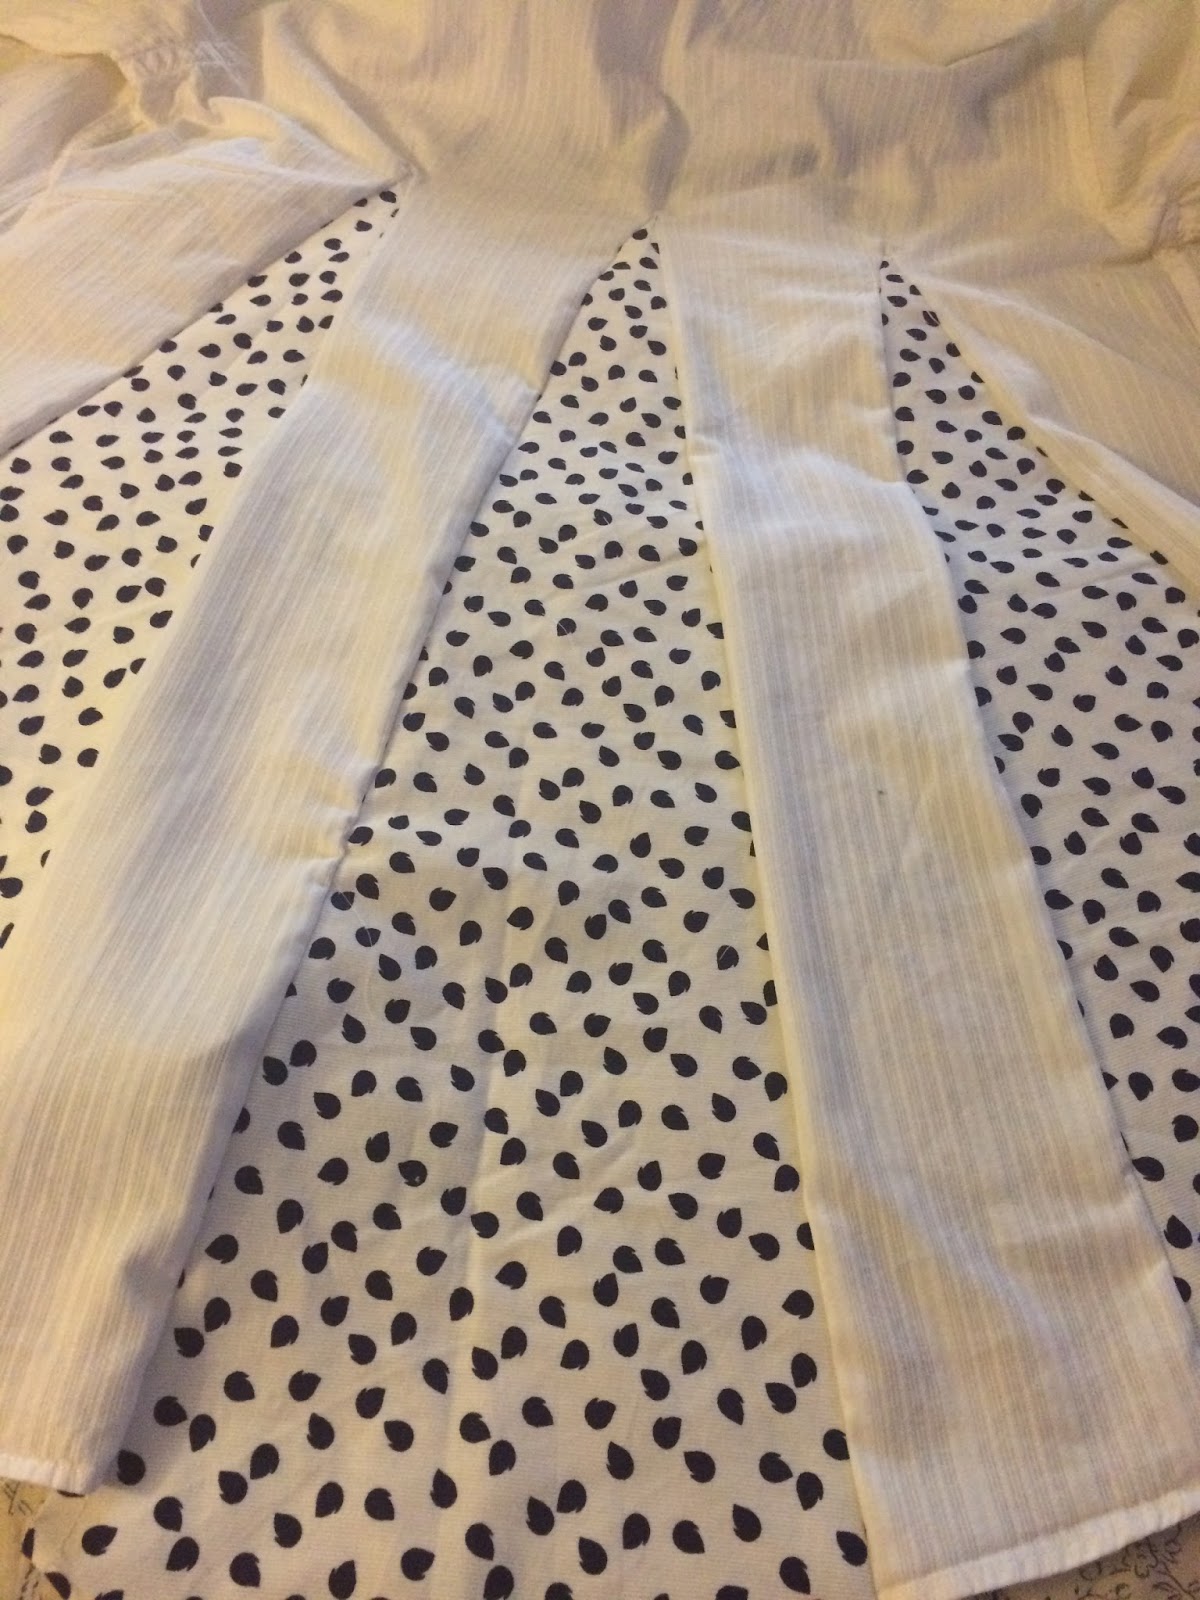
In this tutorial I'll show you how to take an old shirt and make it into a beautiful summer dress.

You can add lace or a different colour fabric. I am a lacy girl so I added lace to give a romantic look.

1: Take off the pocket and the collar, being careful not to rip the fabric.
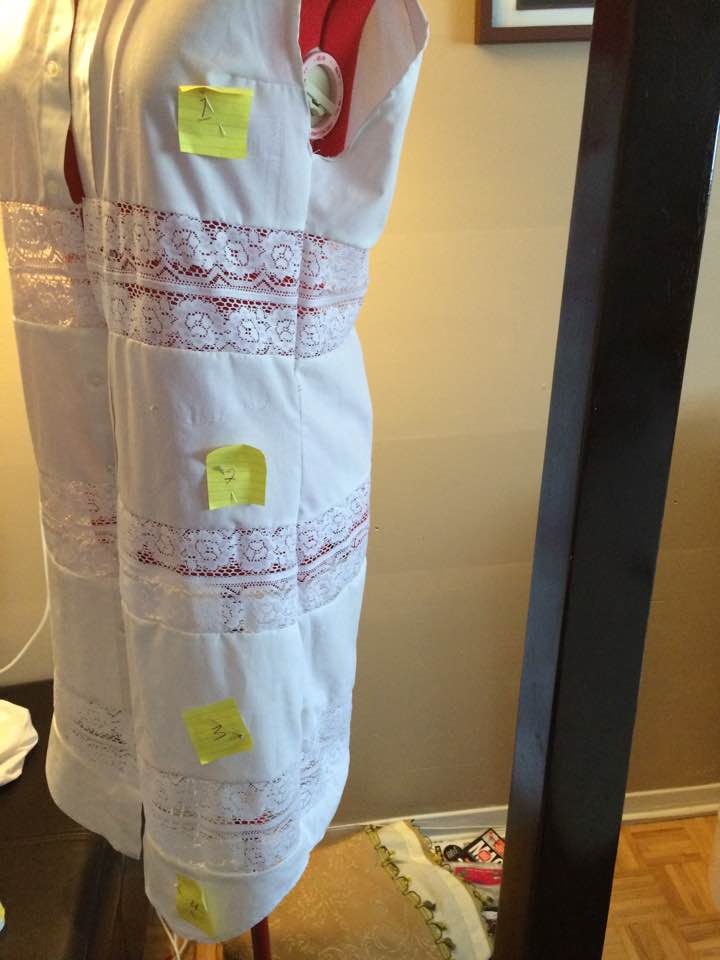
 2: To make the halter use a ruler to draw a straight line from the shoulder to underarm and cut away the sleeve.

3: Determine how wide apart you want to insert lace/fabric. I cut each piece 6". Start cutting from under the arm so as not to alter the armhole.


4: Number each section, so they will not get mixed up when stitching on the lace.

5: Stitch the lace in between in number sequence.

 I wanted the shirt fitted so I took in the sided. this is optional.

Some shirts are tapered if this is the case you can adjust the lace using a small dart to align with the side seam so it will fit flush around the shirt.
 Leave the number pinned on until the dress is complete.


On Alterations.


The lining will not lie flat because it has to be slightly bigger than the actual sweater.
SUMMER DRESS WITH SLIT


Step 3: Match the waist line mark on the blouse pattern to the waistline mark on the sundress pattern

By: Shirley de Gannes
How To Take Measurements
For most of us there is something magical about being able to sew and design clothes.

The creation of beautiful, flattering clothes is
within the capacity of everyone.
How to improve on a Designer Runway Creation
I bought a designer creation, my budget does not allow me this luxury however I could not resist the price, mostly because it was a one of a kind. The size was off so it was difficult to sell, I tried it on and although it was a bit tight I saw potential. The sales lady was so happy to get if off her hand that she further lowered the sales price to an irresistible amount.
To make the dress fit I inserted black & white zebra patterned ribbon at the sides. Wear with black tights - Loving the new look! What magic you can do with a sewing machine.
Sprucing up an old blouse to make it a fashion statement


All you need is some lace


SEWING CLASSES IN PROGRESS

Classes in alterations. Bring your items that need
alterations and we'll show you how. Limited space available.

Sewing class in progress - Learn to sew one on one individual tutoring. Three students a class. One month and six weeks classes. Located in Vaughan, Ontario.
Textiles fall into different categories: Man made fibers, and natural
fibers. The important thing
is that you understand the effect fabric has on style before constructing a garment. Understanding your fabric
How to get a straight even cut with chiffon
Cutting a straight line on chiffon could be challenging because the characteristic of the fabric is unstable and shift causing difficulty when cutting. To cut a straight line measure the length you want then select on thread and pull. Cut along the line as show in the diagram, this will ensure you get a straight and even cut.
 |
| Select thread and pull |


We redesigned this jacket, from an oversized 80's long jacket to a fitted trendy jacket.
Redesigning a purple chiffon dress


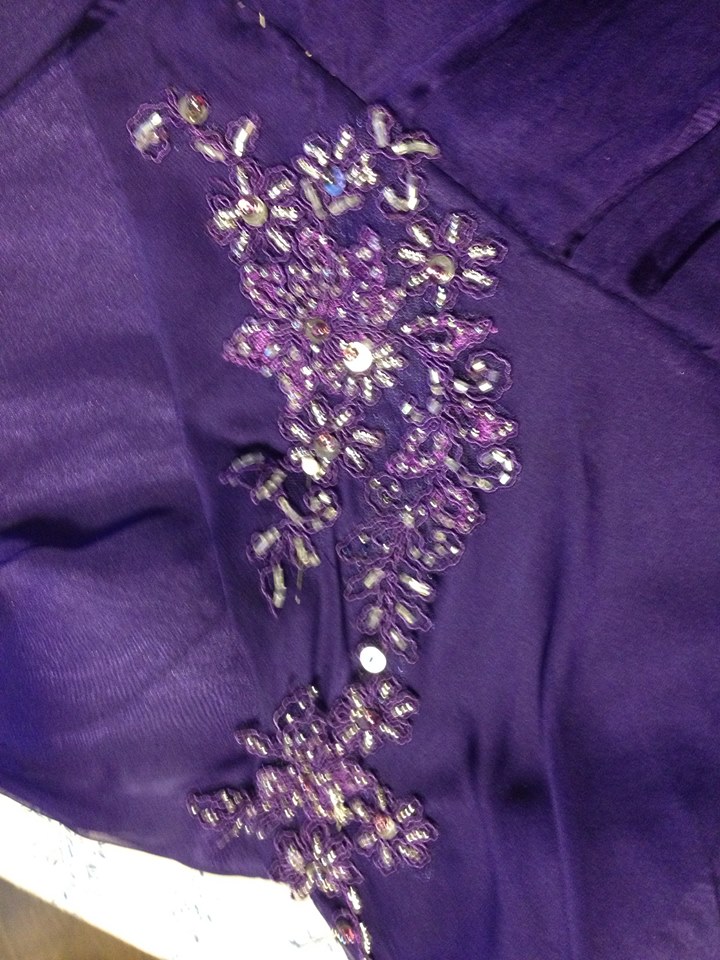
Then I formed a design following the shape of the wrap top, draped the the skirt and formed a rosette at the waist for emphasis. This gave the dress an entirely new look.
Cut fabric to desired length, plus 1 1/2 for hem. Depending on the size of the grommets you are using add extra amount for folding. ie: if grommets are 1 1/2, the cut fabric will measure the length of the desired curtain + 1 1/2" for hen + 1 1/2" to turn under. If you are working with light weight fabric cut 1 1/2" interfacing to stabilize the fabric.
 |
| fold fabric over interfacing |
 |
| Press or pin in place |
To add valance cut extra fabric to the desired length of valance, if you are using chiffon it is a good idea to double the fabric for more body.

To determine where to place gatherers or pleats fold in half, then fold again and mark the folds.

Pleat or gather valance in the middle and at both sides, add trim, then place valance under fold and stitch into place
 |
| Use template to draw the circle to place the grommets |
 |
| Cut out the circle |
When drawing and cutting out circles pin in place to prevent fabric from shifting
You can use your existing shower curtain to determine placement of the grommets. The standard shower curtain have twelve hooks
 |
| Place bottom grommet underneath |
 |
| Place top part of grommet on top and snap into place |


Accurate measurements is the secret of a perfect fit. Refer to the tutorial on: How to take measurements

My friend saw this dress in a magazine and wanted a copy. I did not have a pattern and decided to use patterns I already have, just modifying them to recreate the style.
 I used the "New Look" Pattern for the dress and the "Simplicity" pattern for the jacket.

My friend saw this dress in a magazine and wanted a copy. I did not have a pattern and decided to use patterns I already have, just modifying them to recreate the style.


I extended the New Look bodice pattern as seen in diagram. Use the same method to cut the lining. Because the laces is very light, I pinned the lace to the lining before basting to add weight and keep in place.


I faced the neck. Press seams open and put in zipper.
I used the Simplicity pattern for the jacket.
 |
| Completed Dress with over jacket |
How to take an old shirt and transform it
into a beautiful summer dress.
In this tutorial I'll show you how to take an old shirt and make it into a beautiful summer dress.
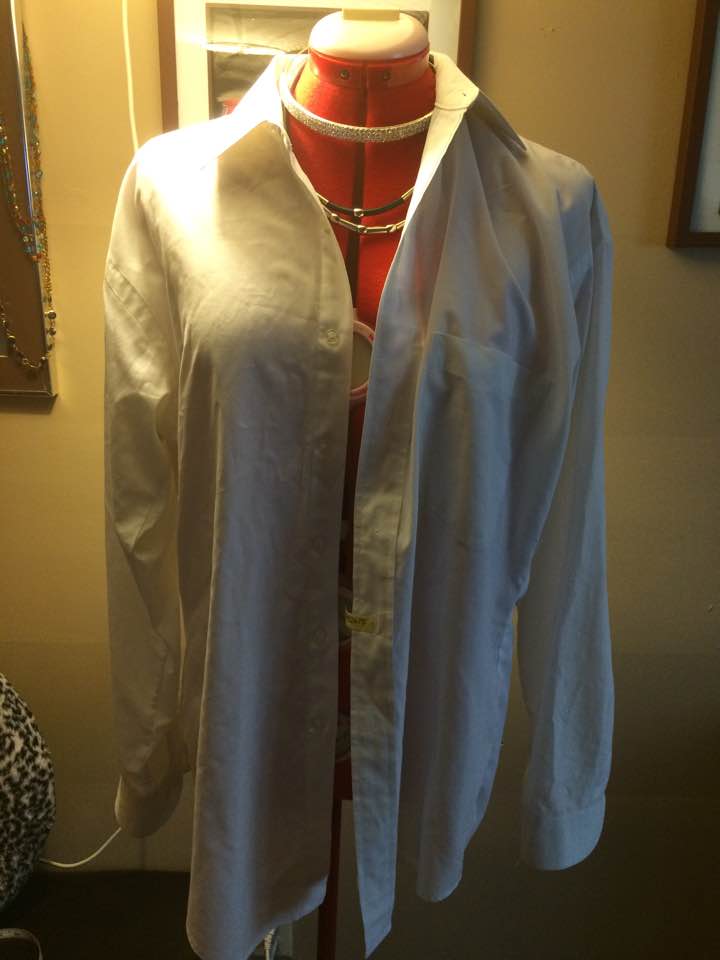
You can add lace or a different colour fabric. I am a lacy girl so I added lace to give a romantic look.

1: Take off the pocket and the collar, being careful not to rip the fabric.


3: Determine how wide apart you want to insert lace/fabric. I cut each piece 6". Start cutting from under the arm so as not to alter the armhole.


4: Number each section, so they will not get mixed up when stitching on the lace.

5: Stitch the lace in between in number sequence.


Some shirts are tapered if this is the case you can adjust the lace using a small dart to align with the side seam so it will fit flush around the shirt.


This is a fun project. it can be worn as a dress, or with tights underneath.
Until our next project continue to enjoy the summer.
Until our next project continue to enjoy the summer.
On Alterations.
If you are inclined to the sewing machine, alterations are worth the while. However, if you have to pay for alterations, consideration should be given to the cost of reconstructing an item versus buying a new piece of clothing. If the garment is unique expensive or irreplaceable then alterations are worthwhile.
 This is a long sleeve shirt that became too tight across the chest and arm.


Inserting a gusset in a shirt
If you have a shirt that is too small, you can insert a gusset at the sides to make it fit.


Cut 2 cone shapes from the underside of the two cut sleeves, see in the diagram.

Open the both side of the shirt from the sleeve to the point you want the gusset to end, (if necessary open all the way down the side of the shirt).


Measure around arm and cut another piece of fabric to insert under sleeve to widen.
Join the under sleeve piece to side gusset as seen in diagram. (If there is enough fabric you can cut the under sleeve and side gusset as one piece without joining underarm)
Base to secure in place before stitching.


Sew from end of sleeve to desired point you want the gusset to end. For this alteration the widest part of the gusset and the under sleeve is 4" and tapered to a cone shape. This measurement will vary depending on your personal measurements and how loose you want the shirt to fit.


If you have any questions please feel free to use the comments,
I will get back to you.
LINING A SWEATER
In this tutorial I'll show you how to line a sweater. Lining a sweater will keep the shape in tact and give added warmth.
Suggested fabric for lining a sweater is cotton jersey or acetate, the stretch in the fabric will be malleable and will adjust to the stretch in the knitted sweater.

1: Fold sweater in two and place on top of lining, (You don't have to measure) Cut the outline of the sweater leaving approximately 11/2 inch. (1/2" seam allowance and 1" for ease).

When cutting the front, leave it open down the front.


3: Pin lining to sweater and hand hem around the neck, down the front, the bottom and around the sleeve.
There may be excess fabric because the lining is cut bigger than the sweater, if this happens make small tucks in the center back neckline and at the bottom back of the lining to make it fit. (this is okay because the lining has to be slightly bigger than the sweater.


The lining will not lie flat because it has to be slightly bigger than the actual sweater.
 |
| finished lined sweater |
SUMMER DRESS WITH SLIT
In this tutorial I'll show you how to combine two patterns to make a fashionable maxi tunic dress with slits up the sides to wear over your pants this summer. You don't need to purchase a new pattern, you can use patterns you already have. This project can be done with a sleeveless top pattern and a one piece summer sheath dress pattern with or without shoulder straps.

Step 1: choose a sleeveless blouse pattern

Step 2: Select a simple sheath sundress pattern with shoulder straps

Step 3: Match the waist line mark on the blouse pattern to the waistline mark on the sundress pattern

Step 4: Match both patterns making sure the waistline match and the underarm of both patterns are lined up. pin both patterns together so it look like one dress pattern. I also tapered the skirt, however that's optional.

Step 5: Place and pin pattern on fabric, determine the length you want and mark the hemline before cutting.


Place cut fabric on lining and cut facing as seen below. When making a sleeveless outfit I cut the neck and armhole as one piece. This gives the garment extra body and a neat finish.
You will notice that the shoulders are narrower in the back diagram. That's because I tapered the shoulder before cutting.
You will see the change in the pictures of the finished project


Step 6: If you decided to pipe the neck and arms you can base the bias binding on to the neckline and armhole to secure in place when machine stitching Piping is optional.


Step 7: If there is no piping you can stitch the lining as seen in the above diagram. If you decide to pipe the arms and neck leave approximately 2" for joining the shoulders as seen the diagram below.


Step 8: Join back and front shoulders together and hand stitch lining to finish.
Step 9: Determine how high you want the slits and stitch sides of garment together.


Finished summer tunic with slits.
Do you have a tablecloth laying around that you never use. Let your creative juices flow and turn it into a beautiful summer outfit.
(This project may be for the advance sewist.)


The design will be an asymmetrical skirt.


3) Serge or zig-zag the four panels, then pin together before stitching.


5) Leave a 7" or 8" opening for zipper.

Add waistband to complete skirt
For the top you can use the remnant of fabric. You will have to play around with placing the pattern and manipulate the fabric to create an interesting design.


1) Serge or zig-zag shoulders and side of shirt before joining together
2) Add collar and cuffs with left over embroidery pieces.
3) finish shirt with small hem.


Comments
Post a Comment